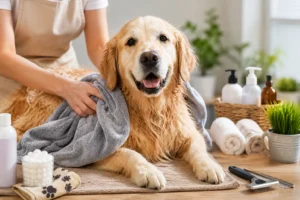
Knowing how to clean dog ears properly can save your dog from discomfort, painful infections, expensive vet visits, and constant irritation. It sounds simple. Sometimes it is. But plenty of owners accidentally make ear problems worse because they clean too aggressively, use the wrong products, or miss early warning signs.
A dog’s ears are sensitive. Very sensitive.
And unlike brushing fur or wiping muddy paws, ear cleaning requires a little strategy. A little patience too! The good news is that once you understand the process, it becomes quick, manageable, and surprisingly effective at preventing long-term issues.
I’ve seen owners ignore minor wax buildup for weeks only to end up dealing with a severe infection later. I’ve also seen the opposite. Owners panic over perfectly normal ear wax and over-clean their dogs into irritation. Balance matters.
This guide breaks everything down step by step. No fluff. No confusing medical language. Just practical advice that helps you clean your dog’s ears safely and confidently.
Understanding Why Dog Ears Need Special Care
Dog ears are not built like human ears. Their ear canals are deeper and shaped differently, almost like an “L.” That shape traps moisture, debris, wax, and bacteria more easily.
Some dogs are naturally more vulnerable than others.
Breeds with floppy ears often struggle more because airflow is limited inside the ear canal. Moisture stays trapped longer. That creates a perfect environment for irritation and infection.
Dogs commonly prone to ear issues include:
- Cocker Spaniels
- Basset Hounds
- Labrador Retrievers
- Golden Retrievers
- Poodles
- Bulldogs
Swimming can also increase risk. So can allergies. Even excessive ear hair plays a role.
Understanding how to clean dog ears becomes especially important if your dog falls into one of these categories.
How Often Should You Clean Your Dog’s Ears?
This is where many owners get it wrong.
More cleaning does not always mean healthier ears.
Over-cleaning can strip away natural protective oils and irritate the ear canal. Under-cleaning allows wax and debris to build up. The goal is consistency, not obsession.
Here’s a general guideline:
| Dog Type | Recommended Cleaning Frequency |
| Healthy dogs with clean ears | Once every 2–4 weeks |
| Dogs with floppy ears | Weekly |
| Dogs that swim often | After swimming |
| Dogs with allergies | As recommended by veterinarian |
| Dogs with chronic infections | Follow treatment schedule |
The best approach is observation.
Healthy ears usually look:
- Light pink
- Clean
- Slightly waxy but not dirty
- Odor-free
If you notice buildup or smell before the scheduled cleaning day, adjust accordingly.
Signs Your Dog’s Ears Need Cleaning
Some dogs make it obvious. Others hide discomfort surprisingly well.
Watch for these signs:
- Frequent head shaking
- Scratching at ears
- Brown wax buildup
- Mild odor
- Dirt inside the ear flap
- Sensitivity when touched
- Rubbing ears against furniture
However, not every dirty ear simply needs cleaning.
Certain symptoms may indicate infection instead:
| Warning Sign | Possible Concern |
| Strong foul smell | Infection |
| Yellow or green discharge | Bacterial issue |
| Swelling | Inflammation |
| Bleeding | Injury or severe irritation |
| Constant crying or pain | Advanced infection |
| Loss of balance | Inner ear problem |
If you see these symptoms, stop cleaning attempts and contact your veterinarian.
Supplies You Need Before Cleaning
Learning how to clean dog ears becomes much easier when you prepare properly first.
You do not need complicated equipment. But you do need the right products.
Recommended Supplies
- Veterinary-approved ear cleaner
- Cotton balls
- Soft gauze pads
- Towel
- Dog treats
- Gloves if preferred
Avoid These Completely
Some products can seriously irritate the ear canal.
Never use:
- Cotton swabs deep inside the ear
- Alcohol
- Hydrogen peroxide
- Vinegar mixtures unless vet-approved
- Harsh soaps
Cotton swabs are especially risky. They push debris deeper and can damage the ear canal.
Simple is better.
Preparing Your Dog Before Cleaning
This step changes everything.
A nervous dog becomes a moving target. A relaxed dog makes ear cleaning fast and manageable.
Choose a calm environment first. Quiet room. Minimal distractions. Good lighting.
Then focus on your dog’s comfort.
Helpful Preparation Tips
- Speak calmly
- Pet your dog before starting
- Let them sniff the supplies
- Use treats early
- Avoid rushing
If your dog hates ear cleaning, start slowly. Very slowly.
Sometimes the first session should only involve touching the ears and rewarding calm behavior. That’s perfectly fine.
Building trust matters more than finishing quickly.
Step-by-Step Guide on How to Clean Dog Ears
Now we get into the actual process.
This method works well for most healthy dogs.
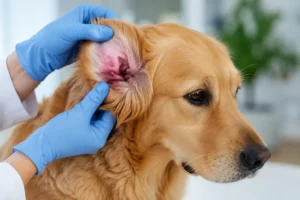
Step 1 – Inspect the Ears
Before applying anything, look carefully inside the ear flap.
Healthy ears should appear:
- Pale pink
- Clean
- Slightly moist
- Free from heavy discharge
Stop immediately if you notice:
- Severe redness
- Swelling
- Thick discharge
- Bleeding
- Strong odor
Those signs require veterinary attention.
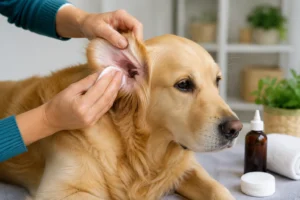
Step 2 – Apply the Ear Cleaning Solution
Lift the ear flap gently.
Place the cleaner tip near the entrance of the canal but do not insert it deeply. Squeeze enough solution to fill the canal lightly.
This part feels strange to many dogs. That’s normal!
Be careful not to touch the bottle tip directly against the ear to avoid contamination.
Step 3 – Massage the Base of the Ear
This step matters more than people think.
Massage the base of the ear for about 20–30 seconds. You’ll often hear a soft squishing sound. That’s good. It means the solution is loosening debris.
The massage helps break apart wax buildup hidden deeper inside the canal.
Gentle pressure works best.
Step 4 – Let Your Dog Shake
Stand back!
Dogs naturally shake their heads to remove loosened debris. Let them do it. It helps clear the canal more effectively than wiping alone.
Yes, it gets messy. Keep a towel nearby.
But this step is useful. Don’t skip it.
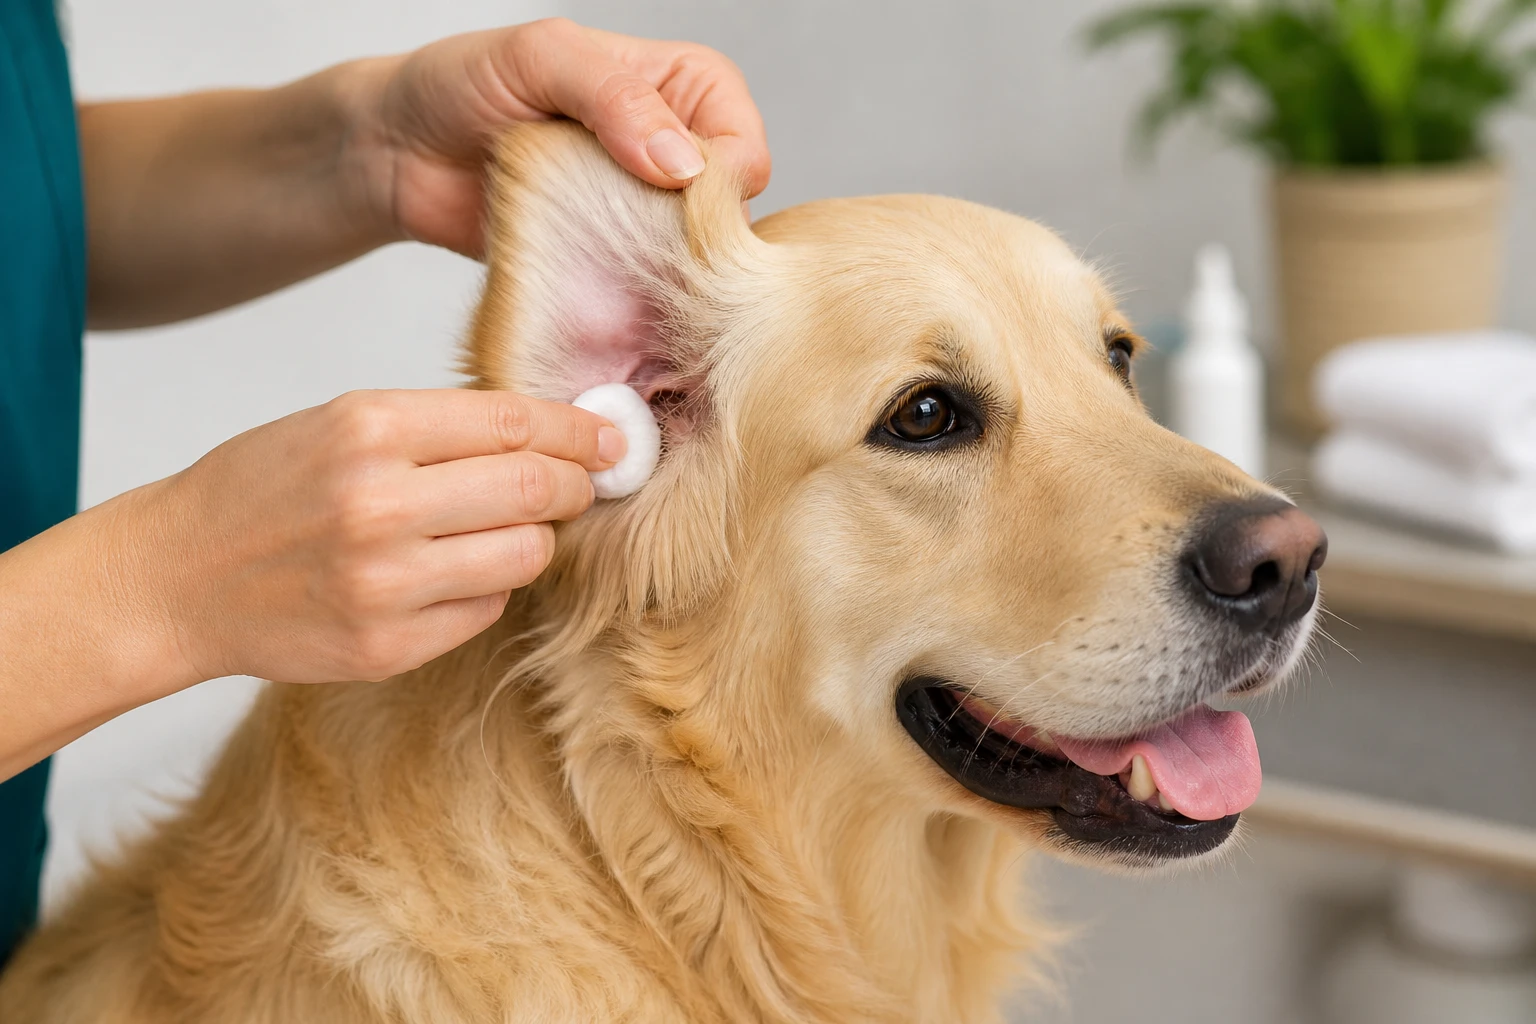
Step 5 – Wipe Away Debris
Use cotton balls or gauze to wipe the visible parts of the ear gently.
Focus on:
- Ear flap folds
- Visible wax
- Dirt near the canal opening
Never dig deeply.
If your finger cannot comfortably reach the area, do not force it.
Step 6 – Reward Your Dog
Positive reinforcement changes future cleanings dramatically.
Treats. Praise. Belly rubs. Whatever motivates your dog.
Dogs remember experiences emotionally. Make ear cleaning feel safe and rewarding.
Common Mistakes Owners Make When Cleaning Dog Ears
Even well-meaning owners accidentally create problems.
Here are the biggest mistakes to avoid.
Cleaning Too Deeply
This causes irritation fast. Sometimes injury too.
Stick to visible areas only.
Using the Wrong Products
Homemade remedies flood the internet. Many are terrible ideas.
A product safe for humans is not automatically safe for dogs.
Ignoring Infection Symptoms
Cleaning infected ears without treatment can worsen inflammation and pain.
Cleaning Too Frequently
This strips protective oils and increases sensitivity.
Skipping Ear Checks After Swimming
Moisture trapped inside ears creates ideal conditions for bacteria and yeast.
Dry ears matter.
How to Prevent Ear Problems Before They Start
Prevention saves money, stress, and discomfort.
Simple habits make a huge difference.
Build a Weekly Ear Check Routine
You do not always need to clean. But checking weekly helps you spot changes early.
Dry Ears After Water Exposure
Use a towel after:
- Swimming
- Baths
- Rain exposure
Moisture control matters more than most owners realize.
Manage Allergies Properly
Many recurring ear infections trace back to allergies.
Common triggers include:
- Food sensitivities
- Environmental allergens
- Seasonal pollen
Groom Carefully
Excess ear hair traps debris and moisture. Some dogs benefit from careful trimming or grooming.
Avoid aggressive hair plucking unless specifically recommended by a veterinarian.
Dogs That Need Extra Ear Attention
Not every dog requires the same level of care.
Some need more support.
Puppies
Puppies benefit from early exposure to ear handling. Gentle practice reduces fear later.
Keep sessions short and positive.
Senior Dogs
Older dogs may become sensitive around the head and ears. Arthritis or hearing changes can increase discomfort.
Move gently.
Dogs With Chronic Ear Issues
Some dogs battle recurring infections due to allergies, anatomy, or underlying conditions.
These dogs often need:
- Prescription cleaners
- Medicated drops
- Strict maintenance schedules
Following veterinary guidance closely becomes critical here.
Natural Ear Cleaning Options: Are They Safe?
Owners often search for natural alternatives. Some are helpful. Others are risky.
The safest option is usually a veterinarian-approved cleaner designed specifically for dogs.
Still, certain natural products may help in mild cases when approved by a professional.
Sometimes Used Options
| Product | Potential Benefit |
| Aloe-based cleaners | Gentle soothing |
| Drying ear solutions | Moisture control |
| Oatmeal formulas | Sensitive skin support |
But caution matters.
DIY internet recipes often cause irritation because ear canals are delicate. Even small chemical imbalances can create inflammation.
When in doubt, stick with trusted veterinary products.
When to See a Veterinarian
Knowing how to clean dog ears also means knowing when not to handle the issue yourself.
Some situations require professional care immediately.
Contact a Vet If You Notice:
- Persistent odor
- Swelling
- Yellow discharge
- Bleeding
- Severe redness
- Pain during cleaning
- Loss of balance
- Repeated infections
Recurring ear problems may point toward deeper issues like:
- Allergies
- Ear mites
- Polyps
- Resistant bacteria
- Hormonal conditions
Treating symptoms alone will not solve the root problem.
Why Ear Cleaning Can Improve Your Dog’s Overall Quality of Life
People often underestimate how uncomfortable ear irritation feels for dogs.
Imagine constant itching you cannot stop. Pressure that never fully goes away. Noise sensitivity. Sleep disruption.
Chronic ear discomfort affects behavior too.
Some dogs become:
- Irritable
- Withdrawn
- Sensitive to touch
- Less playful
Regular ear care helps prevent that downward spiral.
It is not just grooming. It is wellness care.
And honestly, once you establish a routine, it takes very little time.
Five minutes every couple of weeks can prevent major problems later.
Creating a Stress-Free Ear Cleaning Routine
Consistency changes the experience completely.
The more predictable the process becomes, the calmer your dog usually feels.
Try this simple structure:
- Choose the same location
- Use calm body language
- Keep sessions short
- Reward generously
- Stop if your dog becomes overwhelmed
Gradual improvement is still improvement.
Some dogs learn quickly. Others take patience. That’s normal.
Final Thoughts on How to Clean Dog Ears Safely
Learning how to clean dog ears properly is one of the simplest ways to support your dog’s long-term health. It prevents discomfort. It reduces infection risk. And it helps you spot problems earlier before they become expensive or painful.
The key is staying gentle and consistent.
Avoid aggressive cleaning. Use safe products. Pay attention to changes. And never ignore signs of infection.
Most importantly, make the experience positive for your dog. Calm handling and regular routines go much further than force ever will.
Healthy ears may not seem exciting. Until they are not healthy anymore.
That’s when proper ear care suddenly becomes incredibly important.
FAQs
Most dogs only need ear cleaning every 2–4 weeks, but dogs with floppy ears or frequent swimmers may need it more often.
The safest way is using a veterinarian-approved ear cleaner with cotton balls or gauze while avoiding deep insertion into the ear canal.
No. Hydrogen peroxide can irritate sensitive ear tissue and may worsen inflammation inside the ear canal.
Common signs include bad odor, redness, swelling, discharge, excessive scratching, and head shaking.
Small amounts of light brown wax can be normal, but heavy buildup or foul-smelling discharge may signal a problem.
Yes, healthy ears can usually be cleaned safely at home using proper techniques and dog-safe products.
Pain during cleaning may indicate irritation, infection, or overly aggressive handling, so stop and inspect the ears carefully.
Yes. Drying and cleaning the ears after swimming can help reduce trapped moisture and lower infection risk.
Cotton swabs should not be inserted deep into the ear because they can push debris further inside and cause injury.
Breeds with floppy ears like Cocker Spaniels, Basset Hounds, and Retrievers are often more vulnerable to ear issues.